
DNA fingerprinting is a technique used to identify individuals based on unique patterns in their DNA. It is commonly used in forensic science, paternity testing, and genetic research. The process relies on cutting DNA at specific sites using restriction enzymes and separating the fragments by size using a process called gel electrophoresis.
In this activity, you will simulate the process of DNA fingerprinting using a printed DNA sequence and restriction enzymes. By following these steps, you will learn how DNA is cut, sorted, and analyzed to create a unique DNA fingerprint, just like scientists do in real-life forensics and genetics labs.
Science Involved
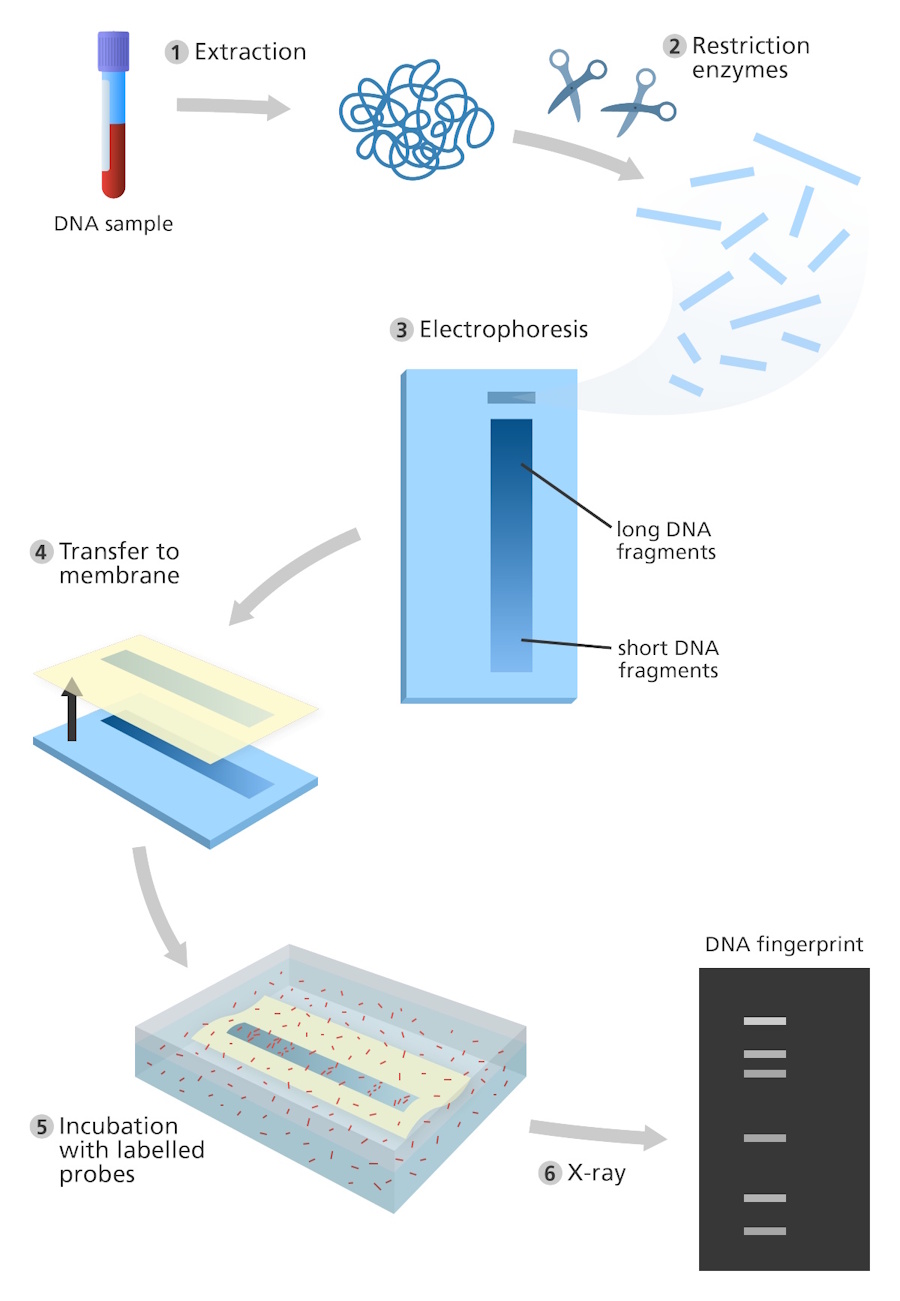
DNA fingerprinting was invented in 1984 by Professor Sir Alec Jeffreys. In real life, DNA fingerprinting begins with collecting a small sample such as blood, saliva, or hair that contains cells with DNA. Scientists first extract the DNA from these cells and then use restriction enzymes to cut it into smaller pieces at specific points. These enzymes act like molecular scissors, recognizing certain short DNA sequences and cutting the DNA there.
Inside human DNA, there are special regions called minisatellites, which are short sequences of bases repeated many times in a row. The number of repeats varies from person to person, so when restriction enzymes cut around these regions, they produce DNA fragments of different lengths for each individual.
Next, the fragments are placed in a soft gel, and an electric current is passed through it, a process known as gel electrophoresis. Smaller fragments move faster through the gel, while larger ones move more slowly, forming a pattern of bands. The pattern is then made visible using a dye or probe.
This unique pattern of bands is a person’s DNA fingerprint. By comparing these fingerprints, scientists can identify individuals, confirm family relationships, or study genetic similarities.
Activity
Requirements
Pre-printed strips of DNA sequences (each group gets a different sequence), a set of simulated restriction enzymes with specific cut sites, graph paper strips (y-axis marked with molecule lengths in base pairs), scissors and pencils.
Custom Restriction Enzyme Cut Sites: GAA, TCC, AAG, GCT and CGT
Procedure
-
Look at the strip of paper with the DNA sequence provided to you. It contains 75 nucleotides (A, T, C, and G). Also review the list of restriction enzyme cut sites provided to you. These are sequences of 3 nucleotides (e.g., GAA, TCC) that tell you where to cut the DNA.
-
Carefully read through your DNA sequence. Every time you find a cut site (such as GAA or TCC), mark the end with a pencil. These are the points where the DNA will be cut. Be sure to find all the places where your enzyme cut sites appear in the sequence.
-
Once you’ve marked all the cut sites, use your scissors to carefully cut the DNA strip at each of the marked points. You should end up with multiple smaller fragments of DNA, each of a different length. Be precise with your cuts.
-
Sort the fragments from longest to shortest.
-
Count the number of nucleotides (base pairs) are in each piece. Write down the lengths of all your DNA fragments.
-
For each fragment, draw a vertical line on the graph given in the observation section at the position that matches the length of the fragment. For example, if your fragment has 13 nucleotides, then make a vertical line at the 13-mark. If there are more than one fragments having the same length, then make a thicker line as shown in the example below.

DNA fingerprint example.
You should now have a series of vertical lines that represent the different DNA fragments after they’ve been cut.
-
Once everyone has completed their graphs, compare your results with others. Each one of you should have a different pattern of lines on the graph.
Observations

Downloads
References and Further Reading
-
What Is a DNA Fingerprint? LabXchange. Accessed on November 5, 2025.